从压缩文档安装
Installing Yii from an archive file involves three steps:
- Download the archive file from yiiframework.com.
- Unpack the downloaded file to a Web-accessible folder.
- Modify the config/web.php file by entering a secret key for the cookieValidationKey configuration item (this is done automatically if you are installing Yii using Composer):
'cookieValidationKey' => 'enter your secret key here',- 使用浏览器访问
/basic/web/index.php,如果有报错则根据报错信息解决错误。 - 执行
php yii server运行yii的内置Web Server,默认运行在http://localhost:8080/
You should see the above “Congratulations!” page in your browser.
依赖:
sudo apt install php7.0-mbstring应用结构
Yii 应用参照模型-视图-控制器 (MVC) 设计模式来组织。
– 模型代表数据、业务逻辑和规则;
– 视图展示模型的输出;
– 控制器接受出入并将其转换为模型和视图命令。
除了 MVC, Yii 应用还有以下部分:
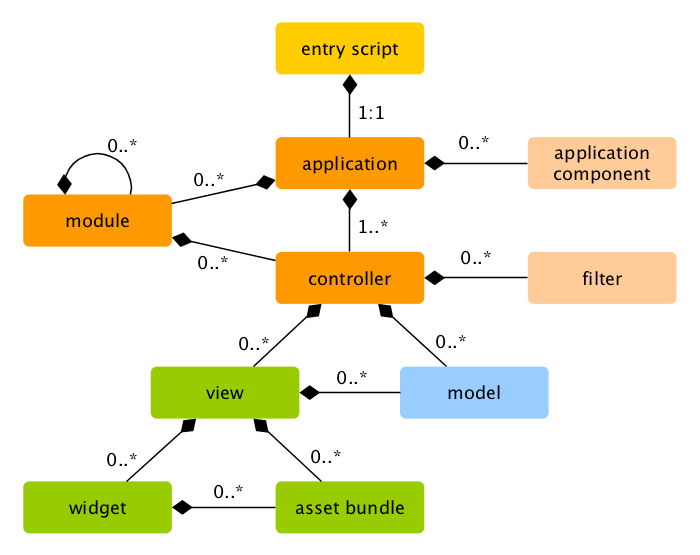
入口脚本:终端用户能直接访问的 PHP 脚本, 负责启动一个请求处理周期。应用:能全局范围内访问的对象, 管理协调组件来完成请求.应用组件:在应用中注册的对象, 提供不同的功能来完成请求。模块:包含完整 MVC 结构的独立包, 一个应用可以由多个模块组建。过滤器:控制器在处理请求之前或之后 需要触发执行的代码。小部件:可嵌入到视图中的对象, 可包含控制器逻辑,可被不同视图重复调用。
下面的示意图展示了 Yii 应用的静态结构:
一个请求处理周期
- 终端访问入口脚本,应用接收到一个包含
ControllerID/ActionID的URL - 控制器从应用主体接管控制后会分析请求数据并传送到模型,传送模型结果到视图。
- 默认会使用
@app/views/layouts/main.php布局文件,同时使布局到渲染结果中。
路由
url中的r参数代表路由,一个全局的独一无二的指向一个action的id。当应用收到一个请求时,他将会检查这个参数,从ControllerID中决定哪一个Controller类将会被实例化并handle这个请求。然后controller会从ActionID中决定执行哪一个action。比如site/say指的是sitecontroller中的sayaction。
Creating an Action
For the “Hello” task, you will create a say action that reads a message parameter from the request and displays that message back to the user. If the request does not provide a message parameter, the action will display the default “Hello” message.
Info: Actions are the objects that end users can directly refer to for execution. Actions are grouped by controllers. The execution result of an action is the response that an end user will receive.
Actions must be declared in controllers. For simplicity, you may declare the say action in the existing SiteController. This controller is defined in the class file controllers/SiteController.php. Here is the start of the new action:
render('say', ['message' => $message]);
    }
}
使用布局文件
public function actionIndex()
{
    $this->layout = 'bjut';//用于渲染的布局文件
    return $this->render('index');//用于渲染的视图文件
}
上述代码中,`actionSay`是`SiteController`类中的一个方法。Yii使用`action`前缀来区分一个方法是否是一个action。
关于action名称的映射:
When it comes to naming your actions, you should understand how Yii treats action IDs. Action IDs are always referenced in lower case. If an action ID requires multiple words, they will be concatenated by dashes (e.g., `create-comment`). Action method names are mapped to action IDs by removing any dashes from the IDs, capitalizing the first letter in each word, and prefixing the resulting string with `action`. For example, the action ID `create-comment` corresponds to the action method name `actionCreateComment`.
Creating a View
Views are scripts you write to generate a response’s content. For the “Hello” task, you will create a say view that prints the message parameter received from the action method:
<?php
use yii\helpers\Html;
?>
<?= Html::encode($message) ?>当render()函数在一个action中被调用时,它会寻找名为views/ControllerID/ViewName.php的文件,例如views/site/say.php。
Like actions, controllers also have IDs that uniquely identify them in an application. Controller IDs use the same naming rules as action IDs. Controller class names are derived from controller IDs by removing dashes from the IDs, capitalizing the first letter in each word, and suffixing the resulting string with the word Controller. For example, the controller ID post-comment corresponds to the controller class name PostCommentController.
控制器向视图传递参数
控制器/Action
return $this->render('index', array('message' => '1222'));视图
<?php echo ($message); ?>接收请求参数
To get request parameters, you can call get() and post() methods of the request component. They return the values of $_GET and $_POST, respectively. For example,
如果在Yii中手动创建表单的话,需要在表单中加上:
<input type="hidden" name="_csrf" value="<?=Yii::$app->request->getCsrfToken()?>" />否则会引发Unable to verify your data submission.异常。
php
$request = Yii::$app->request;

$get = $request->get();
// equivalent to: $get = $_GET;

$id = $request->get('id');
// equivalent to: $id = isset($_GET['id']) ? $_GET['id'] : null;

$id = $request->get('id', 1);
// equivalent to: $id = isset($_GET['id']) ? $_GET['id'] : 1;

$post = $request->post();
// equivalent to: $post = $_POST;

$name = $request->post('name');
// equivalent to: $name = isset($_POST['name']) ? $_POST['name'] : null;

$name = $request->post('name', '');
// equivalent to: $name = isset($_POST['name']) ? $_POST['name'] : '';
Info: Instead of directly accessing
$_GETand$_POSTto retrieve the request parameters, it is recommended that you get them via the request component as shown above. This will make writing tests easier because you can create a mock request component with faked request data.
表单
To achieve this goal, besides creating an action and two views, you will also create a model.
Through this tutorial, you will learn how to:
- create a model to represent the data entered by a user through a form,
- declare rules to validate the data entered,
- build an HTML form in a view.
模型
The data to be requested from the user will be represented by an EntryForm model class as shown below and saved in the file models/EntryForm.php. Please refer to the Class Autoloading section for more details about the class file naming convention.
<?php
namespace app\models;
use Yii;
use yii\base\Model;
class EntryForm extends Model
{
    public $name;
    public $email;
    public function rules()
    {
        return [[['name', 'email'], 'required'], ['email', 'email'], ];
    }
}
?>
action
Next, you’ll need to create an entry action in the site controller that will use the new model.
namespace app\models;
use Yii;
use yii\base\Model;
use app\models\EntryForm;
class SiteController extends Controller{
	// ...existing code...
	public function actionEntry(){
$model = new EntryForm();
if ($model->load(Yii::$app->request->post()) && $model->validate()) {
            // valid data received in $model

            // do something meaningful here about $model ...

            return $this->render('entry-confirm', ['model' => $model]);
        } else {
            // either the page is initially displayed or there is some validation error
            return $this->render('entry', ['model' => $model]);
        }
    }
}
视图
> The view uses a powerful widget called ActiveForm to build the HTML form. The begin() and end() methods of the widget render the opening and closing form tags, respectively. Between the two method calls, input fields are created by the field() method. The first input field is for the “name” data, and the second for the “email” data. After the input fields, the yii\helpers\Html::submitButton() method is called to generate a submit button.
<?php
use yii\helpers\Html;
use yii\widgets\ActiveForm;
?>
<?php $form = ActiveForm::begin(); ?>
<?=$form->field($model, 'name') ?>
<?=$form->field($model, 'email') ?>
<div class="form-group">
<?=Html::submitButton('Submit', ['class' => 'btn btn-primary']) ?>
</div>
<?php ActiveForm::end(); ?>
数据库
Configuring a DB Connection
Before proceeding, make sure you have installed both the PDO PHP extension and the PDO driver for the database you are using (e.g. pdo_mysql for MySQL). This is a basic requirement if your application uses a relational database.
With those installed, open the file config/db.php and change the parameters to be correct for your database. By default, the file contains the following:
return [
    'class' =>  'yii\db\Connection',
    'dsn' => 'mysql:host=localhost;dbname=yii2basic',
    'username' => 'root',
    'password' => '',
    'charset' => 'utf8',
];
The DB connection configured above can be accessed in the application code via the expression Yii::$app->db.
Data Access Object
在db.php中配置数据库连接后即可通过Yii::$app->db进行SQL查询。
public function actionTestdb()
    {
        $connection = Yii::$app->db; //连接
        $connection->open();
        $sql = "SELECT * FROM `admin` ORDER BY `admin_fname` DESC";//执行SQL查询
        $command = $connection->createCommand($sql);
        $result = $command->queryAll();
        print_r($result);
        $connection->close();
        // return $this->render('test');
    }
Yii-debug调试器
修改config/web.php启用调试器。
找到'bootstrap' => ['log'],一行,改为:
'bootstrap' => ['debug'],
'modules' => [
    'debug' => [
        'class' => 'yii\debug\Module',
        'allowedIPs' => ['1.2.3.4', '127.0.0.1', '::1'],
    ],
],调试器默认只能从本机访问时才会开启,因此需要将需要启用调试器的客户端IP写入allowedIPs中。
访问Yii应用,点击右下角的图标即可展开调试器。

发表回复/Leave a Reply